Sonic instructions
You’re just small steps away from accessing the 24x capital multiplier and putting your funds to work with automated trading.
Below is a step-by-step registration guide.
Click the button below. The registration page will open in a new window, allowing you to follow the instructions and complete the registration conveniently. The registration instructions are provided below the button.
1. Create Your Account
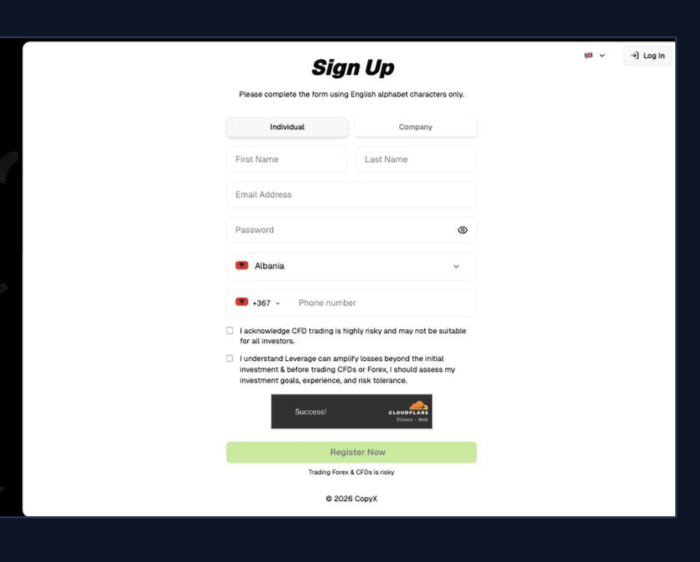
After clicking the button, a registration page will open in a new window. Complete all the required fields and click “Register Now.”
2. Verify Your Email
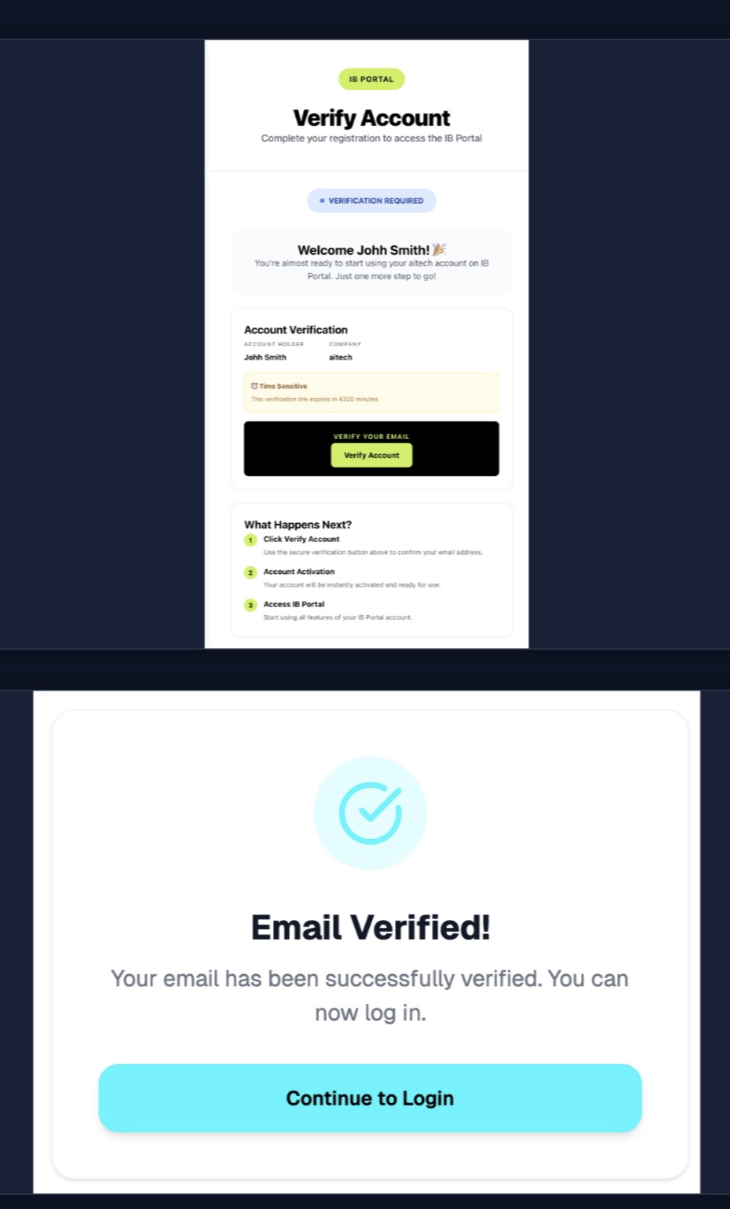
You will then receive a confirmation email. Look for an email titled “Welcome — Verify Your aitech Email.”
Click “Verify Account.” On the verification page, click “Continue to Login.”
3. Log In to the aitech
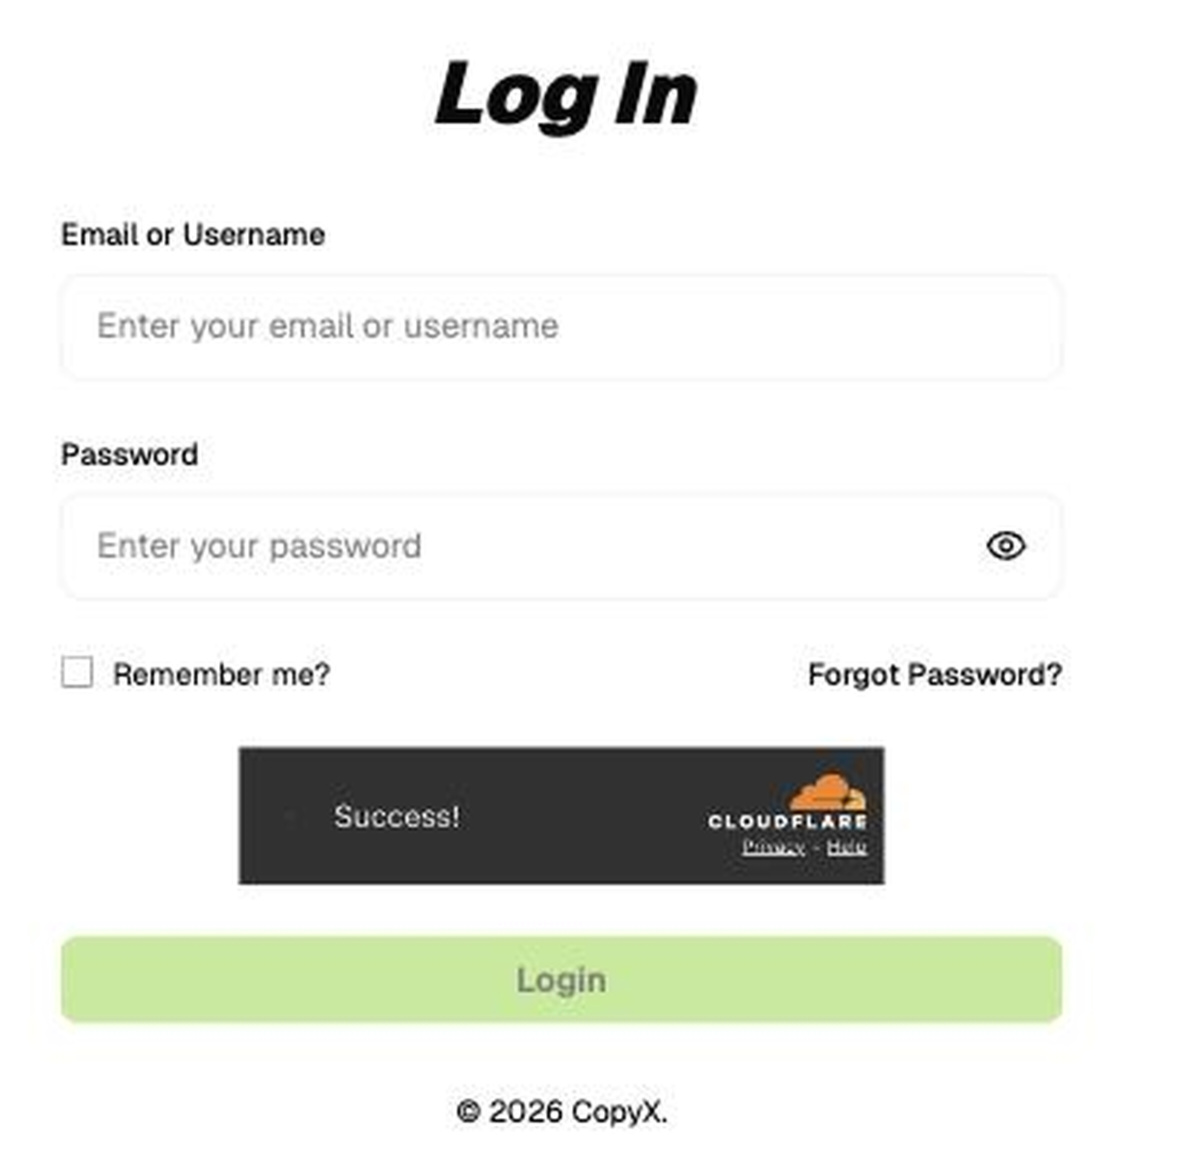
Log in to the aitech using the email address and password you just registered.
Enter your details and click “Login.”
4. Complete the Suitability Survey
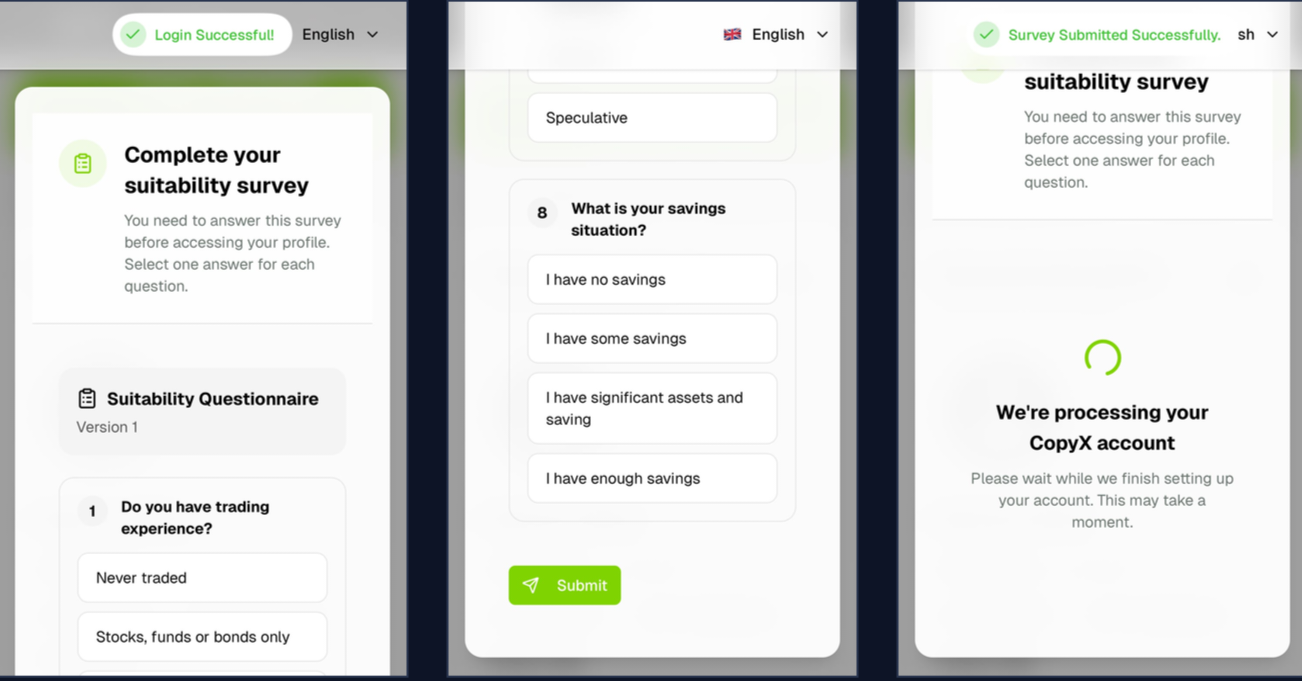
Immediately after your first login, the “Complete your suitability survey” section will appear.
There are eight questions in total. Your profile will only become available after you answer them.
Select one answer for each question and click “Submit” at the end.
The survey asks about your trading experience, preferred position size, the potential impact of losses, employment status, financial situation, financial background, risk tolerance, and savings.
Answer the questions honestly, as this is the broker’s required suitability assessment.
After clicking “Submit,” you will see the message “Survey Submitted Successfully”
5. Register Your CopyX Account
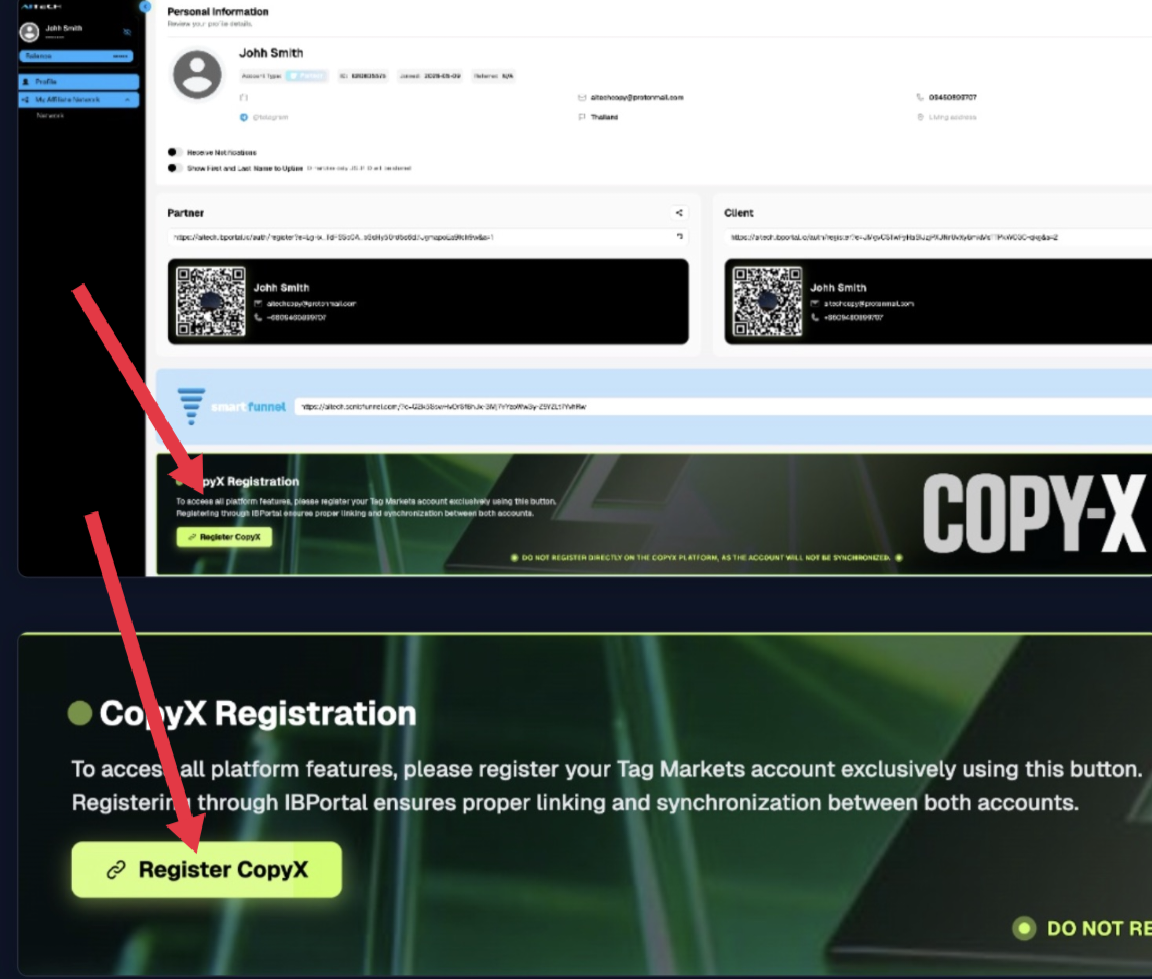
Once your account is ready, stay on the aitech homepage and scroll down until you find the CopyX Registration card.
Click the green “Register CopyX” button. This creates your linked TAG Markets account automaticaly.
6. Sync Your Account
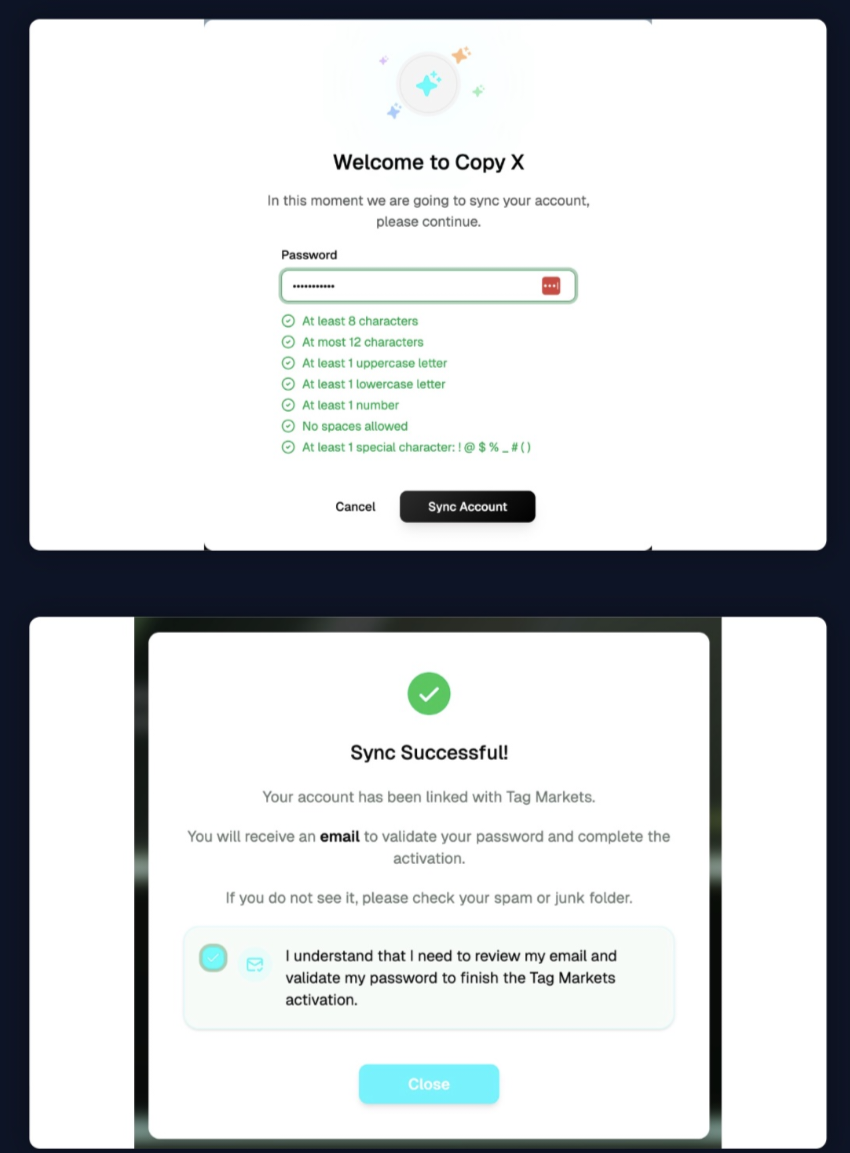
A “Welcome to CopyX” pop-up window will appear. Here you can create a password for your TAG Markets account.
The password can be the same one you use for the IB portal.
Enter a password that meets the requirements, click “Sync Account” and tick the confirmation box.
Then click “Close”. Your TAG Markets account is now ready.
Make sure to save the TAG Markets password you created, as you will need it for future logins.
You will not receive another email confirmation because your email address was already verified during the initial registration.
You can log in to TAG Markets using the same email address and the newly created password, either through the “Login to CopyX” button in your CopyX profile or directly through the TAG Markets login page: https://portal.tagmarkets.com/login
7. Verify Your Identity (KYC)
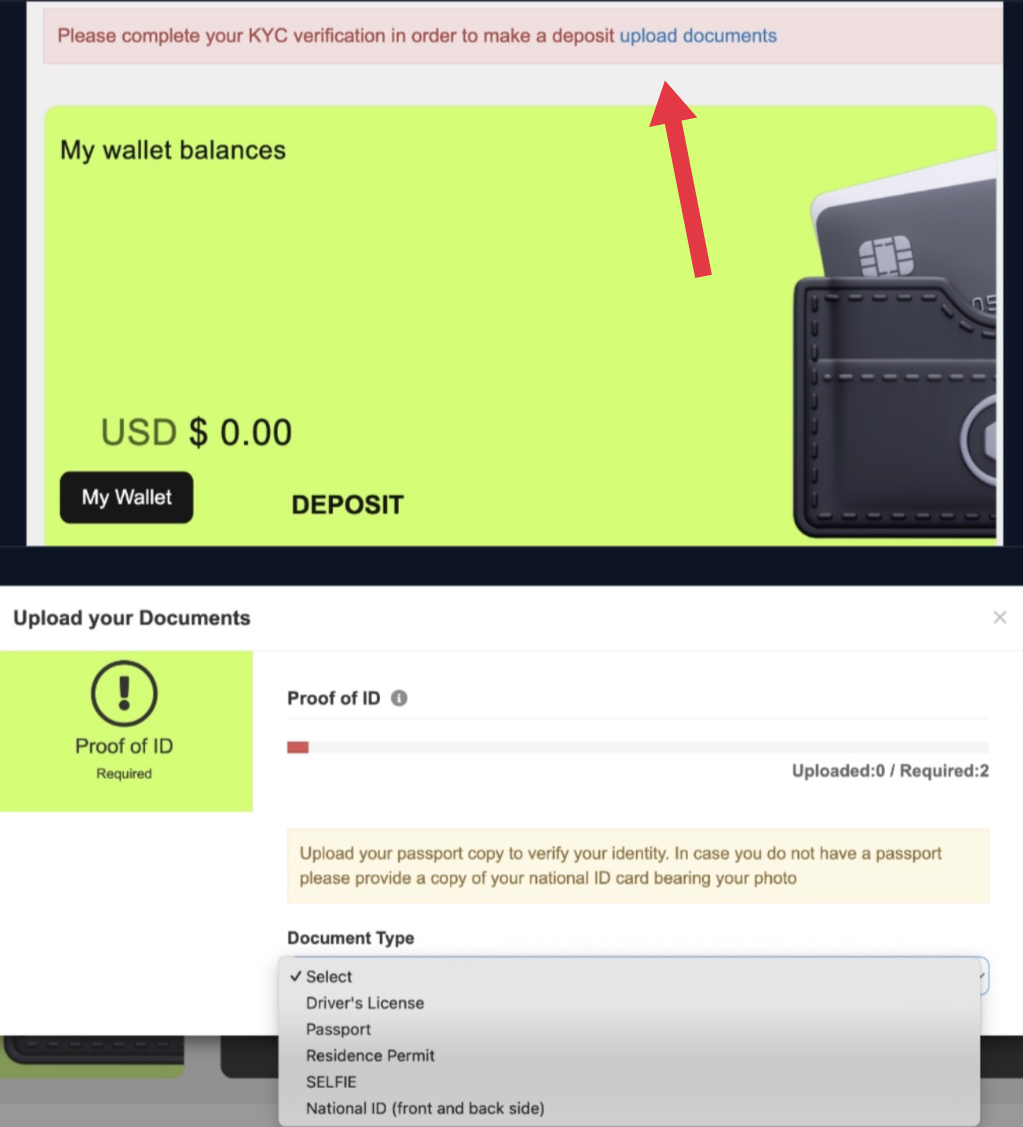
At the top of your TAG Markets dashboard, click “Upload Documents” on the red KYC banner.
Then select two documents from the dropdown menu and upload them.
Accepted documents include:
– Passport
– ID card — front and back
– Driver’s license
– Residence permit
– Selfie
Select the two required documents and upload them.
Once the documents have been uploaded, identity verification will begin. This usually takes only a few minutes.
8. Make a Deposit
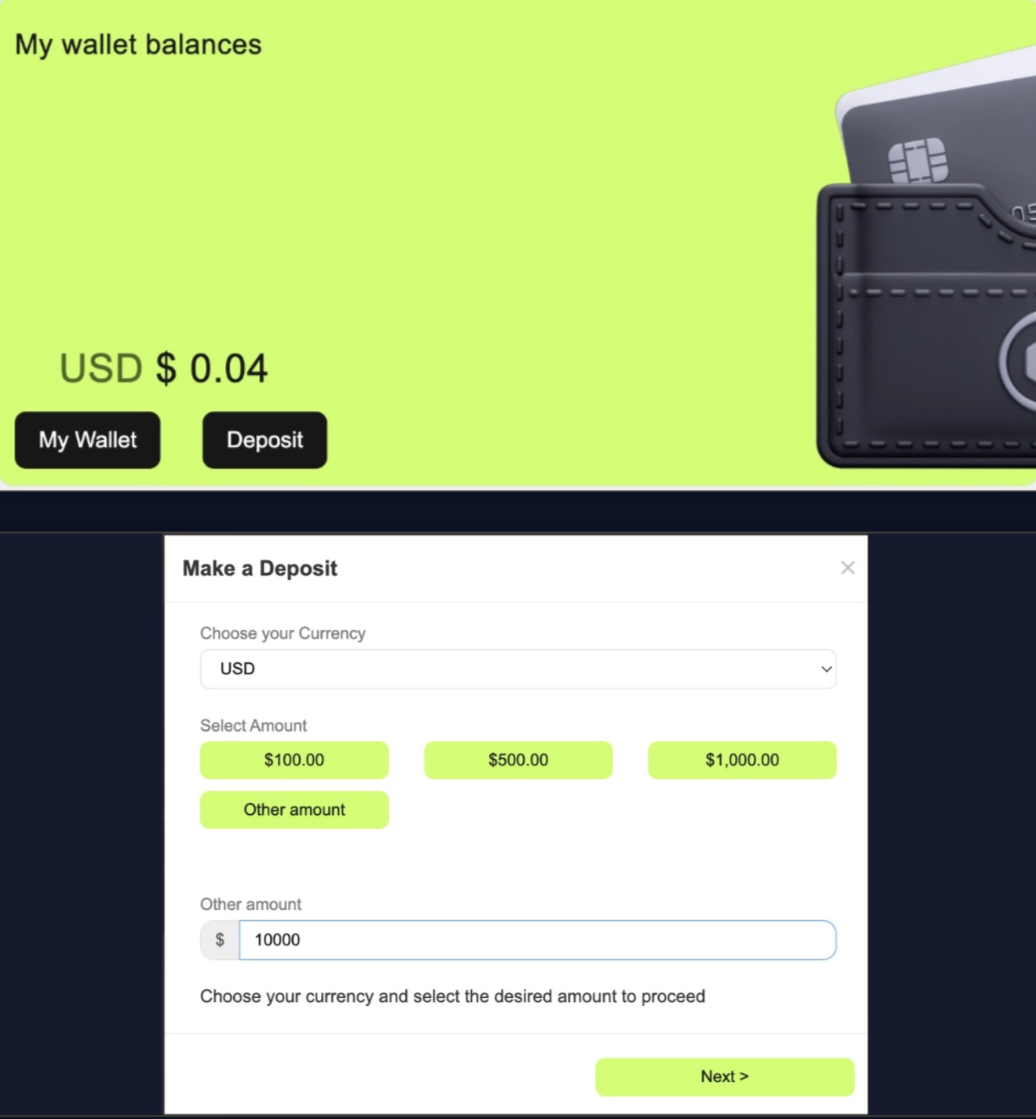
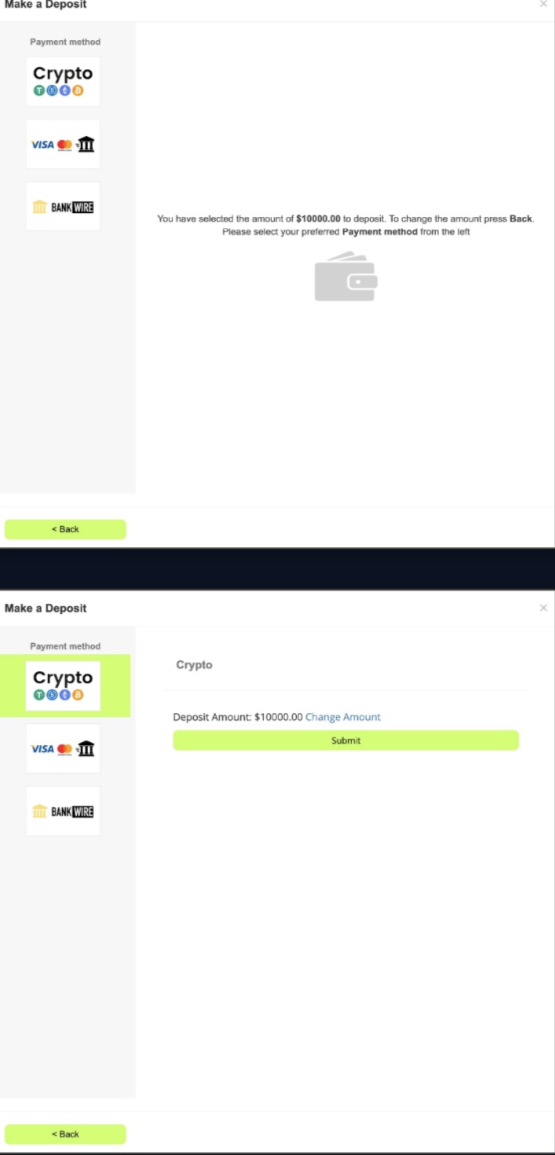
On the TAG Markets dashboard, click “Deposit” on the wallet card.
Select USD as the currency. Then choose one of the preset amounts or enter your desired amount under “Other amount”
Once you have selected the amount, click “Next”
It is recommended to start with an amount that fits your goals and financial circumstances. You can always add more funds to your account later if needed.
9. Choose a Payment Method
Choose your preferred payment method from the payment options panel.
Crypto is recommended for faster processing. Deposits usually arrive within 1–5 minutes and have a 0% fee.
Visa / Mastercard allows you to deposit using a bank card, but a 6% fee applies.
Bank Wire means a bank transfer and usually takes 1–3 business days.
Once you have selected your preferred payment method, click it and then click “Submit.”
10. How to Make a Crypto Transfer
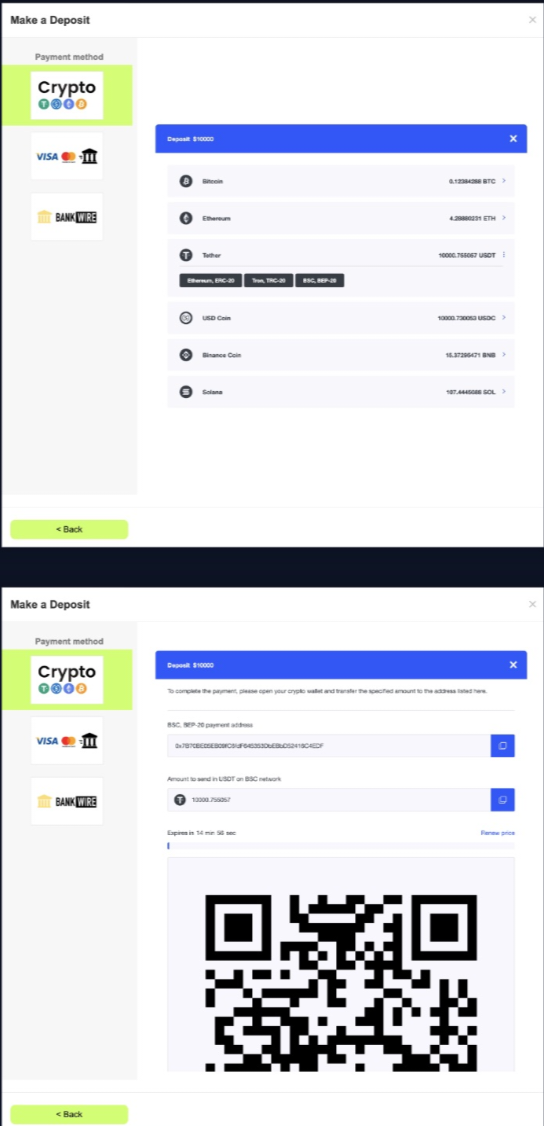
Select one of the following cryptocurrency networks:
– BSC BEP-20
– Tron TRC-20
– Ethereum ERC-20
The supported cryptocurrencies are USDT and USDC.
Copy the payment address and send the funds from your crypto wallet to your TAG Markets wallet.
CRITICAL — WRONG NETWORK = FUNDS MAY BE LOST!
The network you select in TAG Markets must exactly match the network you use to send the funds.
For example, if you select BSC BEP-20 in TAG Markets but send the funds using Tron TRC-20, the funds may be permanently lost.
Always double-check the network on both sides before clicking “Send.”
Important: Use the same withdrawal method as your deposit method. If you deposit using crypto, you can withdraw using crypto as well. (Money Laundering Law.)
Here is a detailed guide explaining how to set up a secure crypto wallet, how to transfer funds to your TAG Markets wallet, and how to transfer your profits back to your bank account.
11. Connect Sonic for Automated Trading
Open the menu on the TAG Markets homepage and select CopyX at the bottom.
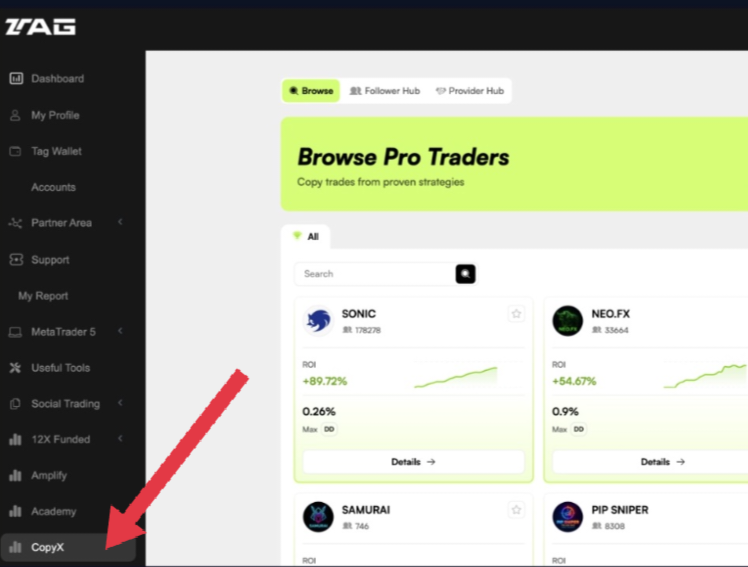
A page with different trading strategies will open.
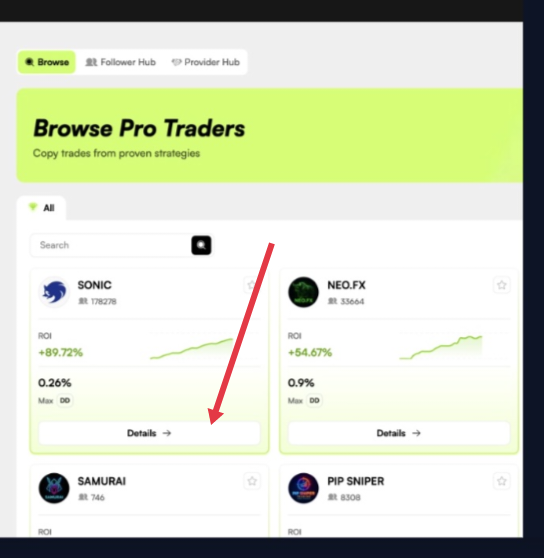
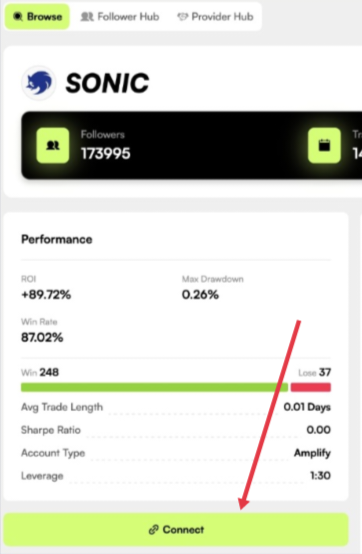
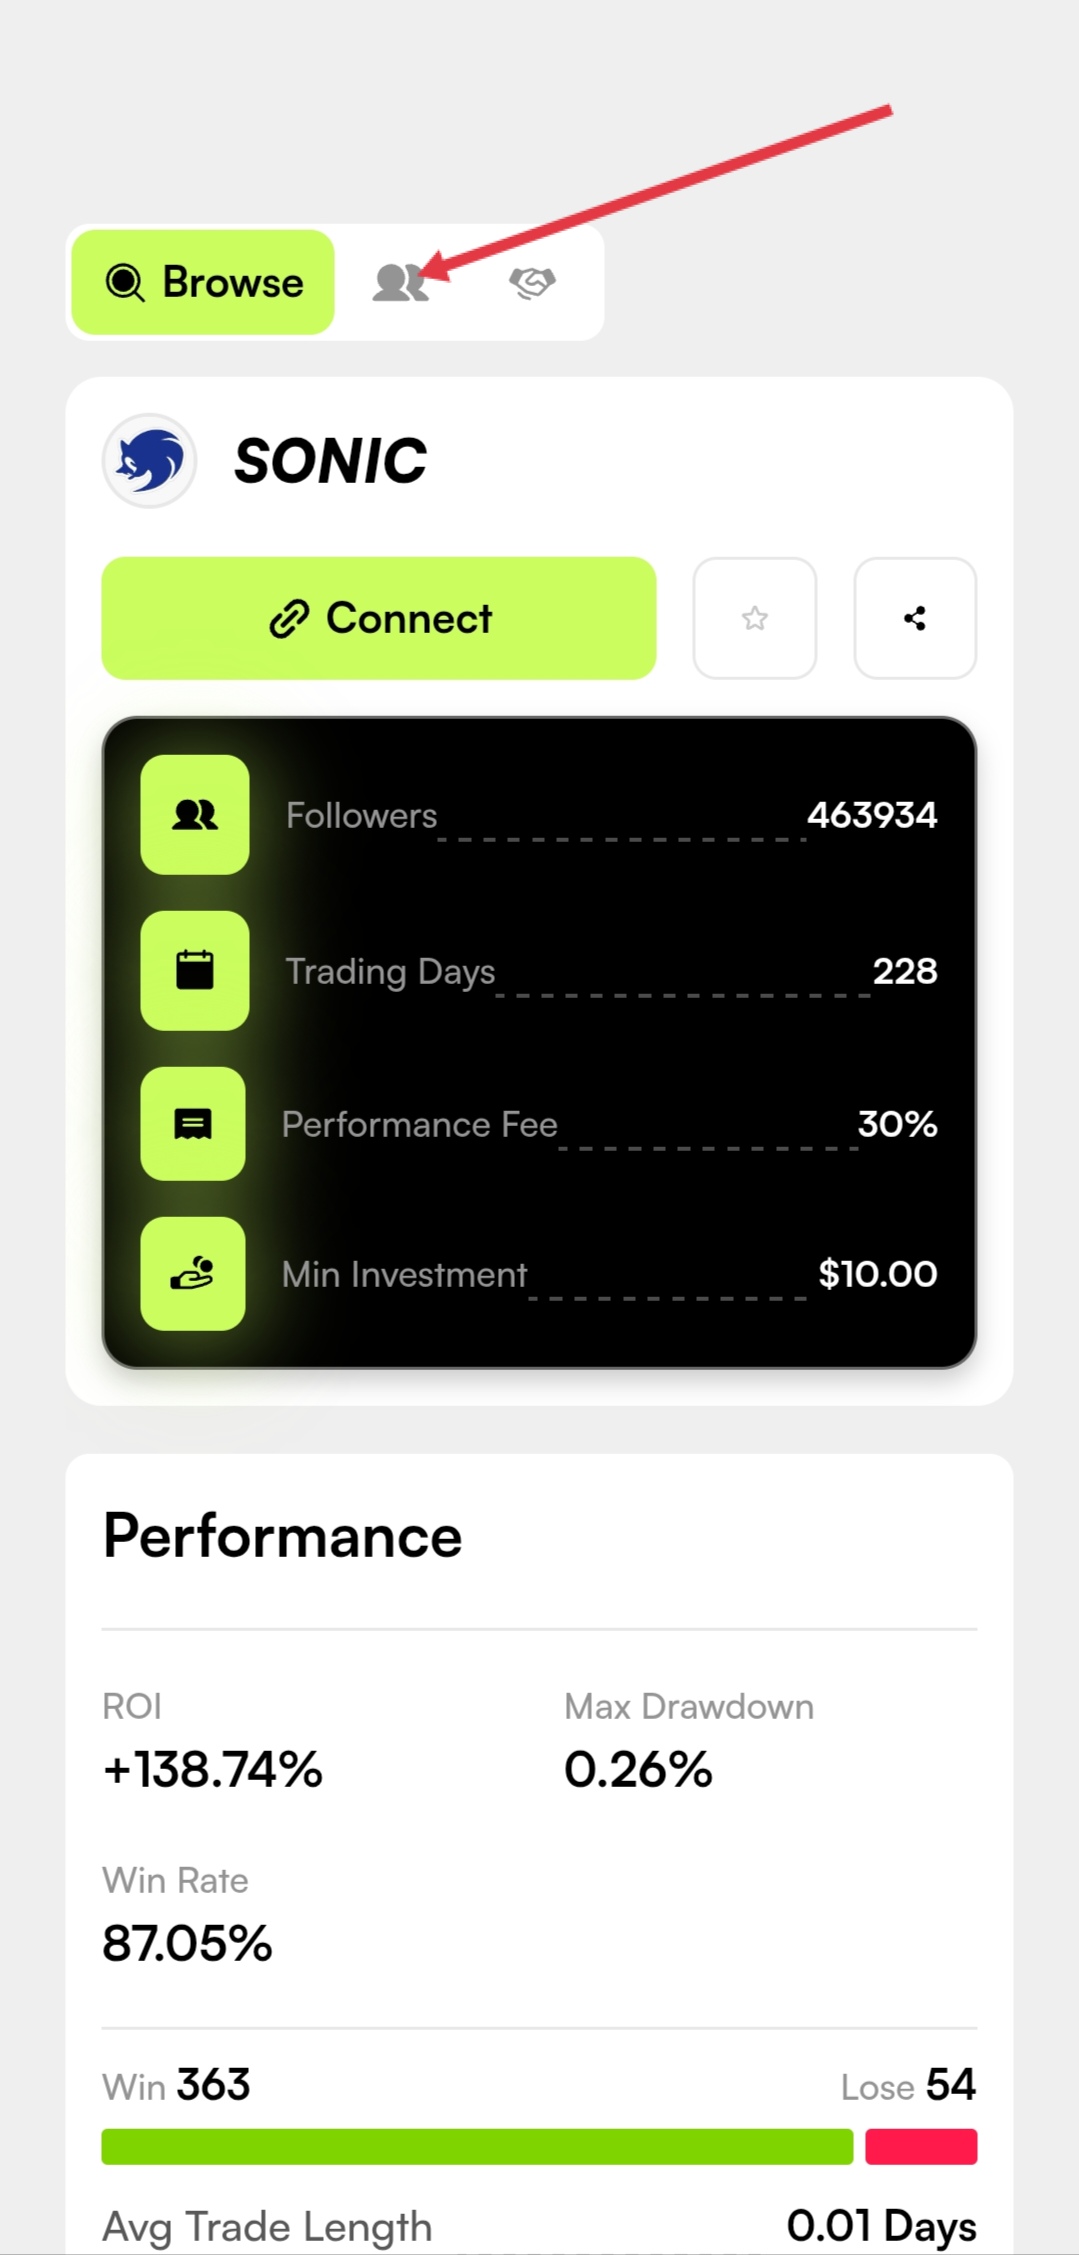
Select the first strategy, Sonic, and click “Details.”
Review the live performance and trading history. Then scroll to the bottom of the page and click “Connect” to begin setting up the copy strategy.
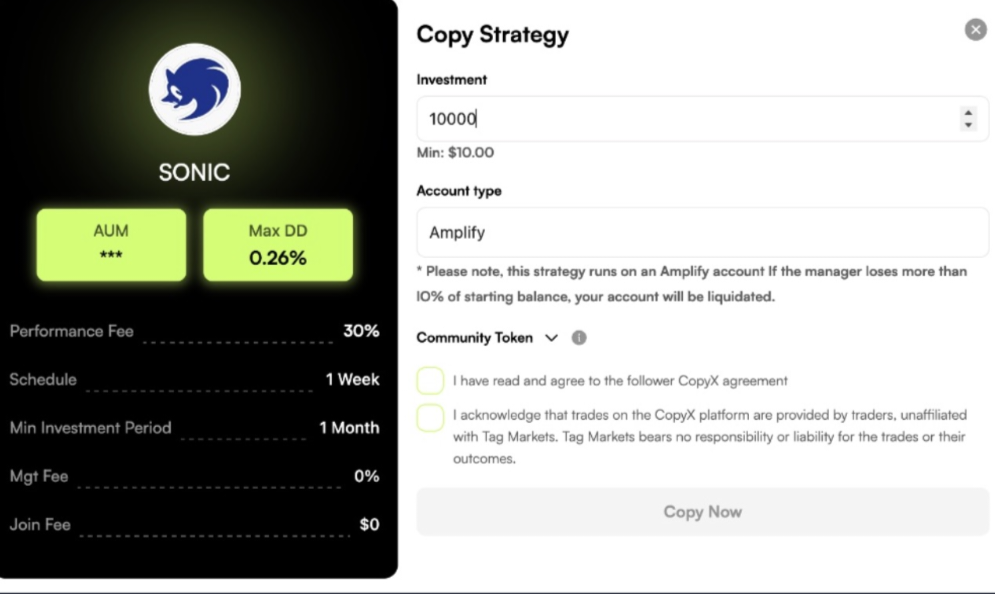
The Copy Strategy window will open.
Enter your investment amount in USD. The minimum amount is $10.
The account type is Amplify.
Choose Your Leverage
12X Standard — Default
$1,000 → $12,000 trading capital
10% drawdown — maximum account loss.
No Token is required.
24X Amplified
$1,000 → $24,000 trading capital
5% drawdown
A Token is required.
Higher leverage increases the potential size of both gains and losses. The next step explains how to enter the required Community Token.
12. How to Enter the Token
To use 24X leverage, you need a Token code.
Token: #aitech
Enter the token in the Token dropdown menu inside the Copy Strategy window and click “Verify.”
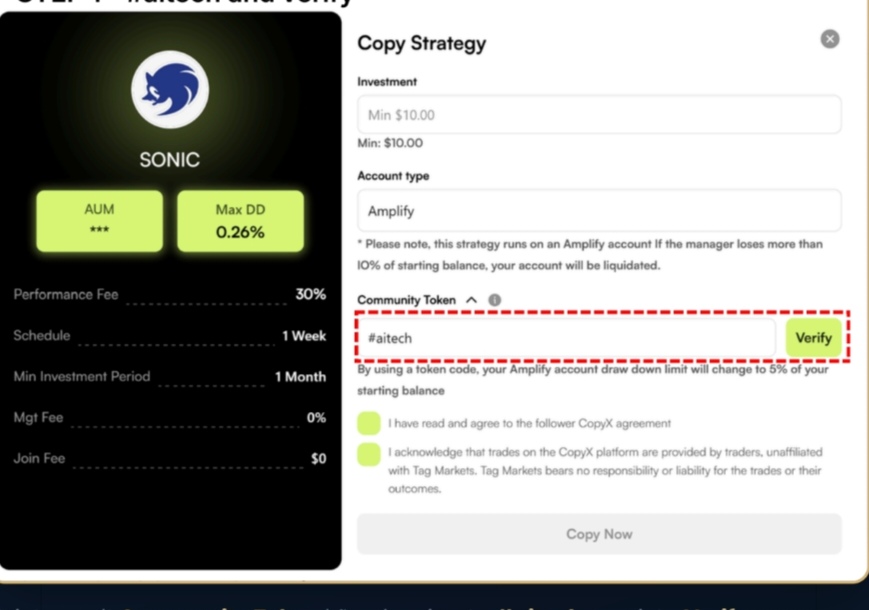
According to the platform’s description, the token changes the drawdown limit on your Amplify account to 5% of the initial balance.
After the token has been verified, a HASH/GU-ID field will appear in the same area.
HASH/GU-ID: 00
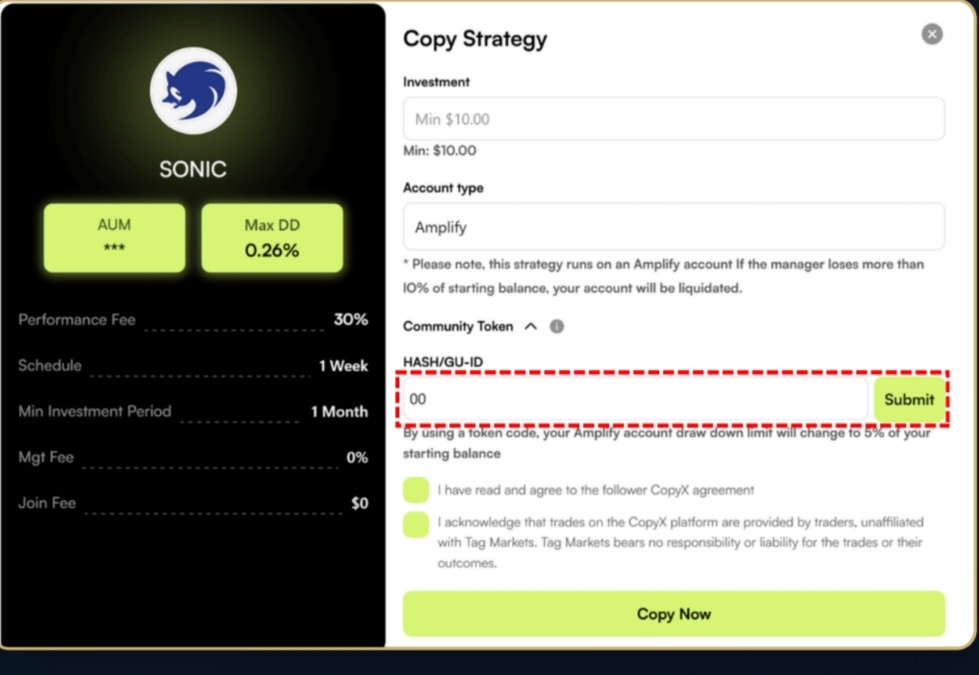
Click “Submit.”
Tick both consent boxes and click “Copy Now.”
Your automated trading account is now active, and you can monitor your trades on an ongoing basis.
Go to Follower Hub to view your trades.
The Trades tab shows each trade executed by Sonic, including the entry price, exit price, trading period, and PnL.
The Strategies tab is where you manage your funds.
Click “Withdraw” whenever you want to request a withdrawal of profits or your initial deposit.
When making a withdrawal, choose:
– Profits — profits only
– Deposit — part of your original capital
According to the platform’s terms, profits can be withdrawn from the first day.
The initial deposit becomes available for withdrawal after a 30-day lock-up period.
Leave a Reply